Part 2 – TECHNICAL ANALYSIS
The financial markets operate on a fundamental principle: the balance between demand and supply. Traders who can identify demand and supply zones effectively gain a crucial edge in predicting price movements and making informed decisions. This blog will guide you through the key concepts of demand and supply zones and how to use them in your trading strategy.
What Are Demand & Supply Zones?
Demand and supply zones are price areas where strong buying (demand) or selling (supply) activity occurs, leading to potential reversals or breakouts. These zones play a crucial role in identifying strategic entry and exit points for traders.
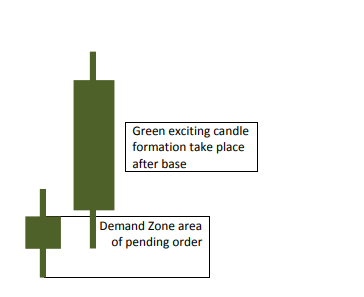
Demand Zone (DZ): A price area where buying interest is significantly strong, causing prices to rise. This is often seen after a downtrend when buyers step in to push the price higher.
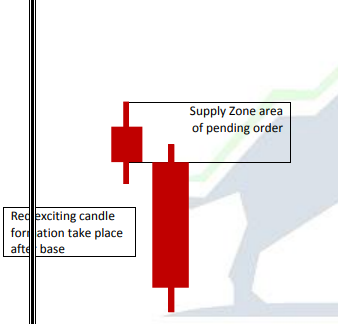
Supply Zone (SZ): A price area where selling pressure is dominant, pushing prices downward. This occurs at resistance levels where sellers enter the market aggressively.
These zones are created by institutional traders, banks, and large market participants who place bulk orders at specific price levels. Basically these zones have bulk pending orders, which are picked up when the price comes in these zones.
Identifying these zones accurately can give traders an edge over the market by helping them avoid low-probability trades.
1. Demand Zone Characteristics:
- Found at the bottom of a downtrend.
- Characterized by strong bullish candles moving away from the zone.
- Multiple retests of the zone indicate its strength.
- Often associated with high trading volume, showing increased buying interest.
2. Supply Zone Characteristics:
- Located at the top of an uptrend.
- Marked by strong bearish candles moving away from the zone.
- More touches strengthen the zone’s credibility.
- Typically, price rejects these zones rapidly due to significant selling pressure.
Types of Demand Zone:
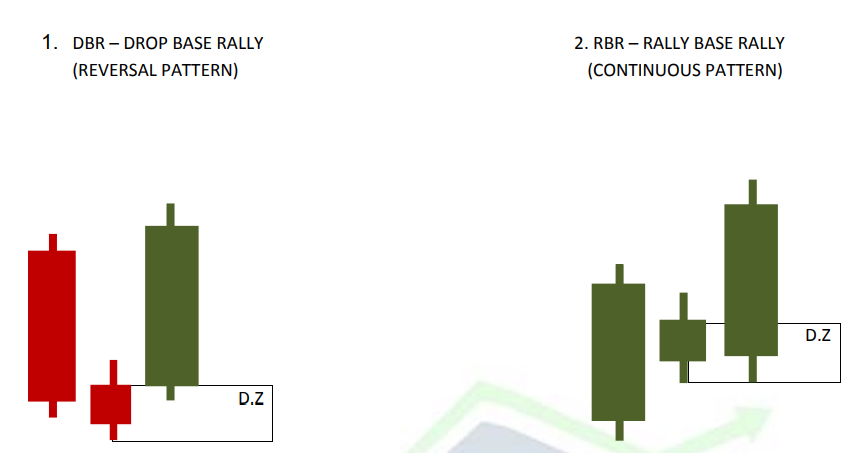
1.- Drop-Base-Rally (DBR): A price drop followed by consolidation and then a strong rally. This indicates that buyers have accumulated orders in the base before pushing prices higher.
2.Rally-Base-Rally (RBR): A bullish continuation pattern where price pauses momentarily before continuing its upward movement.
Types of Supply Zone:
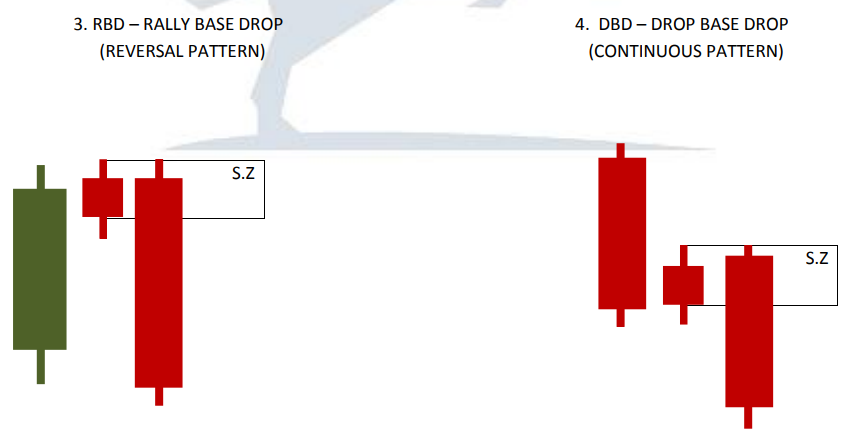
Rally-Base-Drop (RBD): A price increase, brief consolidation, and then a sharp drop. This signifies that sellers have taken control after a short consolidation phase.
Drop-Base-Drop (DBD): A bearish continuation pattern where price consolidates before dropping further.
Zone Marking
- Demand zone While Marking the Demand Zone Higher Body of all base and Lower Wick of all base
is consider
- Line Marked at the Body (Higher)
of the base is called Proximal Line. - Line Marked at the Wick (Lower)
of the base is called Distal Line.
- Supply Zone
While Marking the Supply Zone Lower Body of all base and Higher Wick of all base is
consider.
- Line Marked at the Body (Lower)
of the base is called Proximal Line. - Line Marked at the Wick (Higher)
of the base is called Distal Line.
Steps of marking Demand Zones :
Identification & Marking of Demand Zone
- Mark a horizontal line at current market price
- Look left & down for an explosive upmove (green exciting candle)
- Mark legin base legout.
Now we have 2 ways of marking –

Initially we will focus on body to wick
Identification & Marking of Supply Zone
1.Mark a horizontal line at current market price.
- Look left & up for an explosive drop (red exciting candle)
- Mark legin base legout.
Now we have 2 ways of marking

Important point :
- In demand zone legout will be green while in supply zone legout will be red .
- Legin may be either green or red depending on pattern.
Booster point :
Legout should be explosive, so we can say we have enough pending order on the base and our zone is powerful.
Trade Setup
After marking demand zone or a supply zone the trade setup needs to be marked as under :
ENTRY
- After marking the Demand Zone, entry point is to be marked just above the proximal line.
- After marking the Supply Zone, entry point is to be marked just below the proximal line.
STOP LOSS
Stop Loss should be just below the distal line of the demand zone and just above the distal line of the supply zone.
TARGET:
Target to be marked which is equivalent to the double of the difference between Entry point and Stop Loss (2:1) and make sure
our trade setup should permit this.
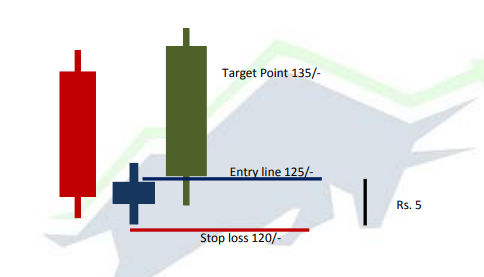
In the above example, Entry is marked at Rs. 125/- Stop Loss is marked as Rs. 120/- and the Target is marked at Rs. 135/-.
How to Use Demand & Supply Zones in Trading
- Entry & Exit Strategies
- Buy at Demand Zones: Enter long positions when the price approaches a strong demand zone and shows confirmation signals like bullish candlestick formations (e.g., hammer, engulfing pattern).
- Sell at Supply Zones: Enter short positions when the price reaches a supply zone and shows reversal signals like bearish engulfing candles or shooting stars.
2. Stop Loss Placement
- Place stop losses slightly below the demand zone for buy trades to protect against false breakouts.
- Place stop losses slightly above the supply zone for sell trades to ensure minimal losses if the price moves against your position.
3. Confirmation with Other Indicators
- Use Volume Analysis to check participation at the zone. A high volume spike near a demand zone suggests strong buying interest.
- Use RSI & MACD to confirm overbought or oversold conditions and identify potential reversals.
- Combine with trendlines & moving averages for added accuracy. For example, if a demand zone aligns with a 200-day moving average, it strengthens the probability of a bounce.
CANDLE BREAK DOWN AND MARKET PSYCHOLOGY
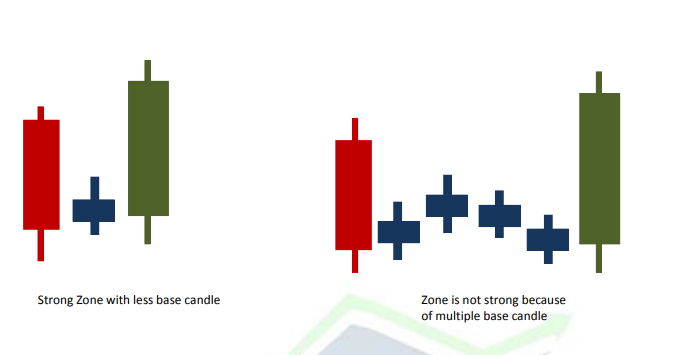
Note – We should use zone with minimum base candle. If we are considering multiple base candle
zone, make sure we should have a strong legout candle.
Price Origin and Closing Concepts
Price origin :
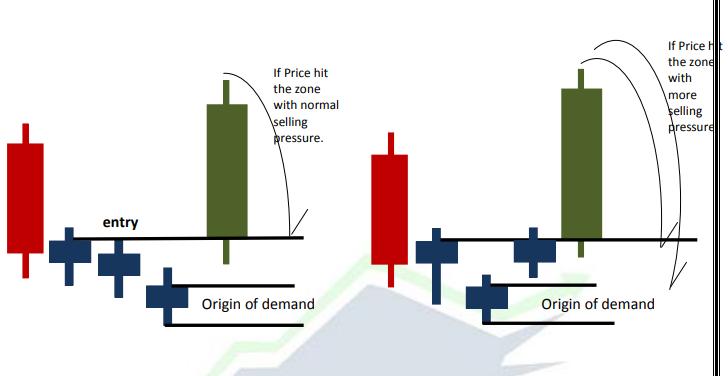
Closing Concepts :
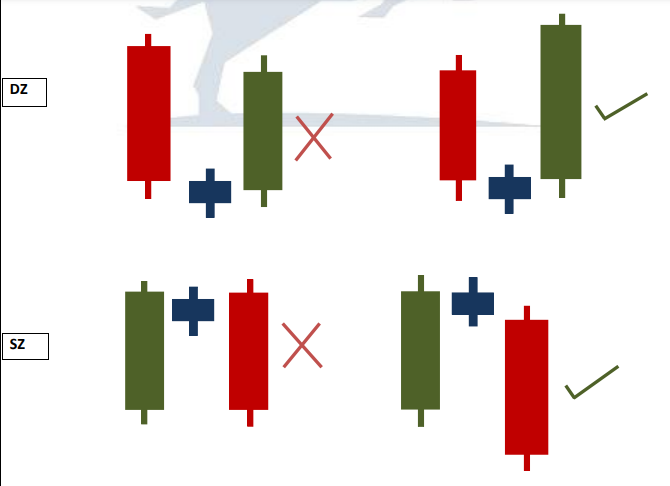
Another Formation of exciting candle :
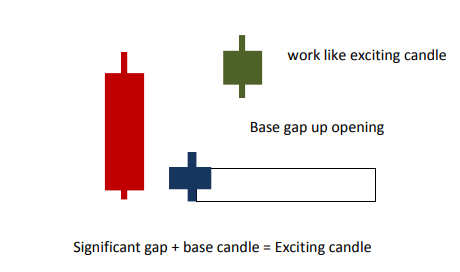
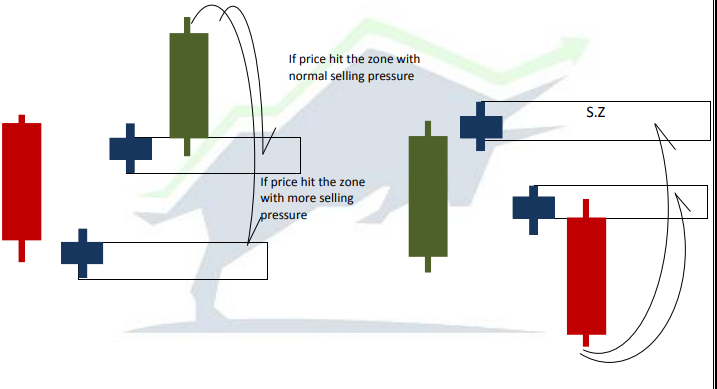
Distribution Of Buying
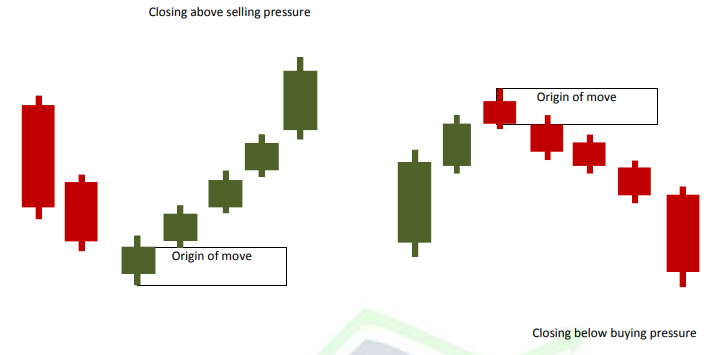
Analyzing Trends
- Zones help us to decide whether to be a buyer or seller. However, trend will help us to decide whether go long in
thedemand or sell short in the supply.
- You should be buyer at demand ifstock isin Uptrend.
- You should seller atsupply ifstock isin Downtrend.
How to look at Trend
- Add 50 SMA on your price chart.
- Starting from the current candle calculate 7 days(candles)backwards.
- Draw vertical line on the seventh candle.
- The point where your vertical line isintersecting the 50 sma, drawa horizontal line.
- Just imagine clock with 12-3-6
The Rule is :
- If your moving average istrading between 12-3 and color of themoving average is green then trend is UP.
- If your moving average istrading between 3-6 and color of themoving average is red Then trend is DOWN.
- If your moving average is trading close to 3 and color of the movingaverage is red or green then trend is Sideways.
Caution:-
Buying at demand when stock is in downtrend and selling at supply when stock is in uptrend can be extremely dangerous.
Mistakes to Avoid When Trading Demand & Supply Zones
- Ignoring Market Context: Always check the overall trend before taking trades. Trading against a strong trend can lead to losses even if the zone appears strong.
- Entering Without Confirmation: Look for reversal candlestick patterns before executing trades. Avoid impulsive trades without clear validation.
- Not Managing Risk Properly: Always use a stop-loss to protect your capital. A well-placed stop-loss ensures that losses are minimized in case the market moves unfavorably.
- Misidentifying Strong Zones: Weak zones can lead to false breakouts and losses. Always prioritize zones with strong price action and volume confirmation.
- Overtrading: Just because a demand or supply zone exists doesn’t mean it must be traded. Wait for the best setups to maintain high win rates.
Advanced Techniques for Demand & Supply Trading
- Trend Confirmation:
- If a demand zone aligns with an uptrend, it increases the likelihood of a successful trade.
- If a supply zone forms during a strong downtrend, it adds confluence to a potential short position.
2. Scaling In & Out:
- Instead of entering a trade with full capital, consider scaling into positions near demand zones and scaling out near supply zones.
3. Identifying Institutional Orders:
- Institutional traders leave clues in the form of large volume spikes at demand and supply zones. Recognizing these patterns can provide insight into smart money activity.
Conclusion
Understanding demand and supply zones is essential for successful trading. When used correctly, these zones provide high-probability trade setups and help in risk management. By combining them with technical indicators, multiple time frame analysis, and a solid risk management strategy, traders can significantly improve their market predictions and trading success.
The key to mastering demand and supply trading is patience, discipline, and continuous learning. Stay focused, refine your strategies, and keep evolving with the market.
Stay tuned for more insights on advanced trading techniques in our upcoming blogs!
BUSINESS IDEAS & SIDE HUSTLES
Designed with WordPress
