Tag: sidehustle

  • Trade Like a Pro: The Best Entry & Exit Strategies in Trading

    Trade Like a Pro: The Best Entry & Exit Strategies in Trading

    PART 7 – TECHNICAL ANALYSIS

    Entry and exit strategies are crucial for profitable trading. A well-planned entry increases the probability of success, while a strategic exit ensures maximum gains and minimal losses. This blog will guide you through professional entry and exit techniques based on demand and supply zones, ensuring you make informed trading decisions.

    Understanding Trade Setup

    Before entering a trade, it is essential to mark key demand and supply zones. Here’s how:

    1. Marking the Entry Point:
    • Demand Zone Entry: Place the entry just above the proximal line of the demand zone.
    • Supply Zone Entry: Place the entry just below the proximal line of the supply zone【92:0†DOC-20240412-WA0000.pdf】.
    1. Stop-Loss Placement:
    • For Buy Trades: Stop-loss should be set just below the distal line of the demand zone.
    • For Sell Trades: Stop-loss should be placed just above the distal line of the supply zone【92:1†DOC-20240412-WA0000.pdf】.
    1. Setting the Target:
    • The target is typically set as twice the difference between entry and stop-loss (Risk-to-Reward: 2:1).
    • Ensure the trade setup allows for this ratio before execution【92:2†DOC-20240412-WA0000.pdf】.

    Entry Strategies

    1. Set & Forget Entry (Score 7+)

    • Entry is placed with a predefined stop-loss and target, requiring minimal monitoring.
    • Suitable for strong demand or supply zones with high credibility【92:6†DOC-20240412-WA0000.pdf】.

    2. Confirmed Entry (Score 5-6)

    • Wait for price action confirmation before entering a trade.
    • Ideal for moderately strong demand/supply zones【92:7†DOC-20240412-WA0000.pdf】.

    3. Aggressive Entry (Score 5+)

    • Entry is made in anticipation of price movement without full confirmation.
    • Used by experienced traders with high risk tolerance【92:8†DOC-20240412-WA0000.pdf】.
    TRADE SCORE

    Some more Important Entries

    • HOW TO TRADE ON SINGLE TIMEFRAME ?
    • HOW TO TRADE AGAINST TREND ?

    case1:

    Image: pdf pg25

    case2:

    Image: pdf pg25

    • IF PRICE COME WITHOUT FORMING SUPPLY ZONE ?

    case3 :

    Image: pdf pg26

    Exit Strategies

    1. Target-Based Exit

    • Predefined profit target is set at twice the risk amount (2:1).
    • Ensures disciplined profit booking【92:9†DOC-20240412-WA0000.pdf】.

    2. Trailing Stop-Loss Exit

    • Adjust stop-loss to secure profits as price moves in favor.
    • Best for trend-following trades to maximize gains【92:10†DOC-20240412-WA0000.pdf】.

    3. Break-Even Exit

    • Stop-loss is moved to the entry point when price moves favorably.
    • Used to minimize risk and protect capital【92:11†DOC-20240412-WA0000.pdf】.

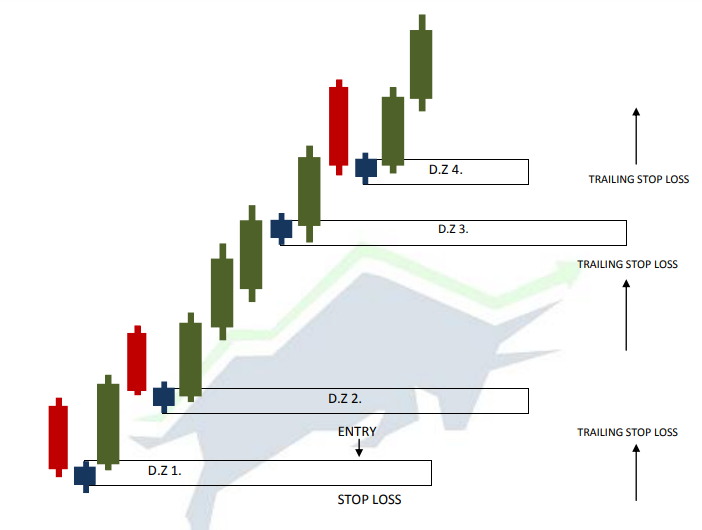
    Trailing Stop Loss

    We do stop loss trailing when the price is on all time high and forming new demand zones.
    We shift our stop loss down to the distal line of newly formed demand zone and we will do this until it will get stop loss.

    Image: pdf pg40

    Trade Management & Psychology

    1. Follow Your Plan: Stick to your strategy and avoid emotional trading.
    2. Avoid Overtrading: Only take high-probability setups with proper risk-reward ratios.
    3. Journal Your Trades: Keep track of entry and exit decisions for future learning【92:12†DOC-20240412-WA0000.pdf】.

    Conclusion

    A well-defined entry and exit strategy is key to successful trading. By using demand and supply zones, proper stop-loss placement, and disciplined execution, traders can maximize their profitability and reduce unnecessary risks. Implement these strategies, refine your approach, and trade like a pro!

    Stay tuned for more professional trading insights!

    PART – 1 TECHNICAL ANALYSIS

    PART – 6 TECHNICAL ANALYSIS

    TheHustleSpot

    BUSINESS IDEAS & SIDE HUSTLES

    Designed with WordPress

  • How To Use Sectorial Analysis For better Trades

    How To Use Sectorial Analysis For better Trades

    PART 6 – TECHNICAL ANALYSIS

    Sectoral analysis is the process of studying a specific industry or sector to understand its performance, trends, risks, and opportunities. Investors, entrepreneurs, and policymakers use this analysis to make informed decisions about business strategies, investments, and economic policies. It provides insights into market demand, competition, regulatory changes, and technological advancements within a sector.

    Sector Wise Analysis

    SECTOR ANALYSIS

    Weightage – If highly weightage stocks of any particular sector are high then nifty of that particular sector may go up, whereas if
    highly weightage stocks of any particular sector are down then nifty of that particular sector may also go down.
    There is a direct relationship between highly weightage stocks and sector of that particular stocks.
    For Example: it HINDCOPPER is going down than entire nifty metal may go down and vice – versa.

    NIFTY CORELATION

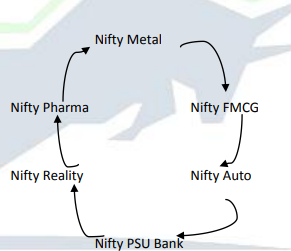
    Sector rotation is very important to understand the concept of sector support.

    All the sectors of nifty faces high and low They keep traveling, id one is high than other is low.
    Different sectors rotate around each other. The cycle keeps on moving around, if Nifty Metal is high at
    present then may be in future Nifty Metal may have a law. In the same way if Nifty Auto is low at present, then may be in near future Nifty Auto may have a high.

    We will not go opposite/against the sector. rather we always need sector in our support/favor.
    Hence, Sector support is one of the most important element while trading.

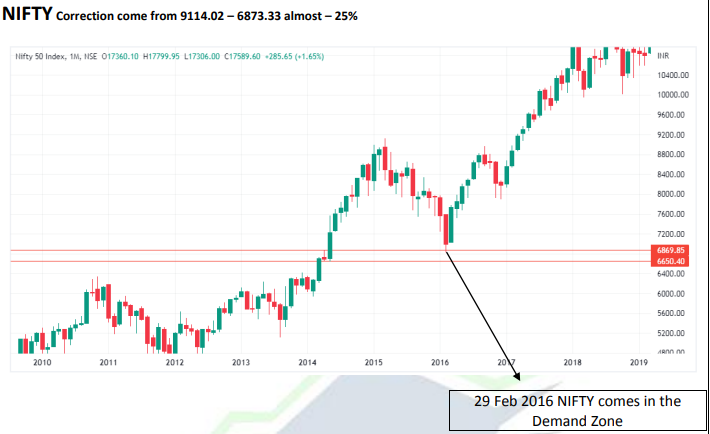
    NIFTY CHART
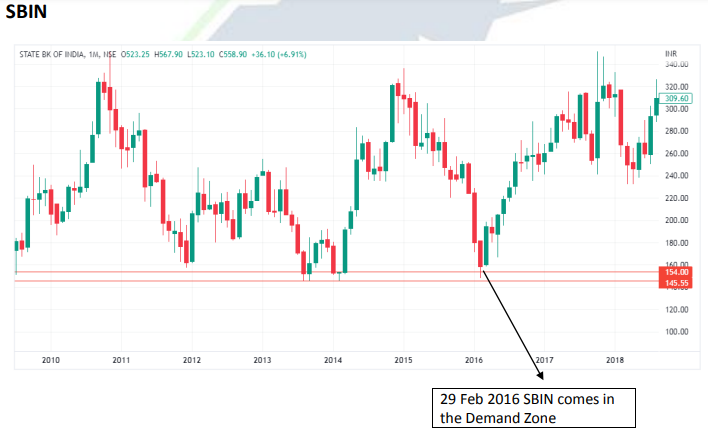
    SBI CHARTS

    When Nifty on 29 Feb 2016 comes down in the demand zone, similarly SBIN also come down in the demand zone, which means
    if NIFTY goes up, then SBIN also goes up as its already in the demand zone.

    This is how Sector and Stock support each other.

    HOW TO DO SECTOR ANALYSIS?
     Firstly, prepare a separate market watch with all the sectors of Nifty.
     Start from the Top-Down approach of the particular sector. From yearly to daily
     After the selection of stock, if stock is in zone and sector of that particular zone is also
    approaching towards its zone than the chances to react of that particular stock increases.
     Sector and Stock support each other in the movement.
    Booster Point :
    If any single timeframe of sector coincide with stock we can give 2 No.
    If get entry in both stock and its respective sector- we give 2 No.

    Stop Loss Trailing

    We do stop loss trailing when the price is on all time high and forming new demand zones.
    We shift our stop loss down to the distal line of newly formed demand zone and we will do this until it will get stop loss.

    TRAILING STOPLOSS

    Conclusion:

    Studying and understanding sectorial analysis is very important for executing best profitable trades , specially if you want to trade in indexes like Nifty50 & NiftyBank , and even Dow Jones. We have almost completed our study, if you want to master technical analysis keep trying , at least for two weeks try to mark the supply and demand zones and you can do paper trading.In future blogs I will also provide you some great demand & supply zones. These blogs are oly for educational purposes !!

    Stay tuned for more insights and business ideas !!

    PART – 7 TECHNICAL ANALYSIS

    PART – 5 TECHNICAL ANALYSIS

    TheHustleSpot

    BUSINESS IDEAS & SIDE HUSTLES

    Designed with WordPress

  • Gap Theory And Some Important Candlestick Patterns

    Gap Theory And Some Important Candlestick Patterns

    PART 5 – TECHNICAL ANALYSIS

    Candlestick Patterns

    1.BULLISH HARAMI : Signifies UP move

    BULLISH HARAMI

    First candle should be red and second candle should be green.

    Second candle body should be within the range of first candle
    body and wick should be within the range of wick

    2.BEARISH HARAMI : Signifies Down move

    BEARISH HARAMI

    First candle should be green and second candle
    should be Red.

    Second candle body should be within the range of first candle
    body and wick should be within the range of wick.

    3.BULLISH ENGULFING : Signifies UP move

    BULLISH ENGULFING

    First candle should be red and second candle should be green.

    Second candle body should be within the range of first candle
    body and wick should be within the range of wick.

    4.BEARISH ENGULFING : Signifies Down move

    BEARISH ENGULFING

    First candle should be green and second candle
    should be Red.

    Second candle body should be within the range of first candle
    body and wick should be within the range of wick.

    5.MORNING STAR : Signifies UP move

    MORNING STAR

    Green candle should close above half of the body of the red
    candle .
    For safer side we will consider this only when green candle
    should close above complete range of red candle so we
    can say we have a strong DBR structure.

    6.EVENING STAR : Signifies Down move

    EVENING STAR

    Red candle should close below half of the body of the green
    candle .
    For safer side we will consider this only when red candle
    should close below complete range of green candle so we
    can say we have a strong RBD structure.

    7.Hammer : Bullish pattern

    HAMMER
    1. Inverted Hammer : Bearish pattern
    INVERTED HAMMER

    9.Shooting Star : A Hammer at the end of down trend or an inverted hammer at the end of an up trend

    SHOOTING STAR

    GAP THEORY

    Real Gaps : The market truly closed and later on truly re-opened providing a difference in price (previous day close
    and next days open).
    Commodity market are prone to rollover gaps.

    Fake Gaps : Generally occurs as a result of mathematical calculation.
    These gaps occurs only in global market and do not occur in Indian Markets.

    Inside gap : If a gap occurs within the range of the previous candle, it is called as an Inside Gap.

    INSIDE GAP

    Outside gap : If a gap occurs outside the range of the previous candle, it is called as an Outside Gap

    OUTSIDE GAP

    Novice Gap : A gap in the same direction of the trend, it is called as a Novice GAP.

    NOVICE GAP

    Pro Gap : A gap in the opposite direction of the trend, it is called as a PRO GAP

    PRO GAP

    APPLICATION OF GAPS ( NOVICE & PRO GAP )

    APP 1. A novice gap into the zone makes that particular trade a high probability trade.

    GAP1

    APP 2. A novice gap into the a pro gap makes that particular trade a high probability trade.

    GAP2

    APP 3. A pro gap from the zone makes that particular trade a high probability trade

    GAP3

    ANOTHER IMPORTANT GAP

    Significant Gap : A gap that occurs beyond the range of previous candle is called as significant gap.

    Window Gap : A pro gap can also be a window gap.

    WINDOW GAP

    LOTL – ( LEVEL ON THE TOP OF THE LEVEL /

    LEVEL OVER THE LEVEL )

    Case 1:

    LOTL1

    Case 2:

    LOTL2

    Case 3:

    LOTL3

    TRAP LEVELS

    Bull Trap – These are supply zone where conventional technical analysis people will make
    novice buying mistake.

    BULL TRAP

    Bear Trap – These are demand zone where conventional technical analysis people will make
    novice selling mistake.

    BEAR TRAP

    Common Mistakes to Avoid

    1. Ignoring Trend Direction: Always trade with the trend to increase success probability.
    2. Using Indicators in Isolation: Combine multiple indicators to confirm signals.
    3. Overcomplicating Analysis: Too many indicators can create conflicting signals.
    4. Failing to Manage Risk: Always use stop-loss and proper risk-reward ratios.

    Stay tuned for more insights on advanced trading techniques in our upcoming blogs!

    PART – 6 TECHNICAL ANALYSIS

    PART – 4 TECHNICAL ANALYSIS

    TheHustleSpot

    BUSINESS IDEAS & SIDE HUSTLES

    Designed with WordPress
  • Mastering Risk Management in Trading: The Key to Long-Term Success

    Mastering Risk Management in Trading: The Key to Long-Term Success

    PART 3 – TECHNICAL ANALYSIS

    Risk management is an essential skill that every trader must master to ensure long-term profitability and capital preservation. Without proper risk management, even the best trading strategies can lead to significant losses. In this blog, we will explore crucial risk management techniques derived from professional trading methodologies.

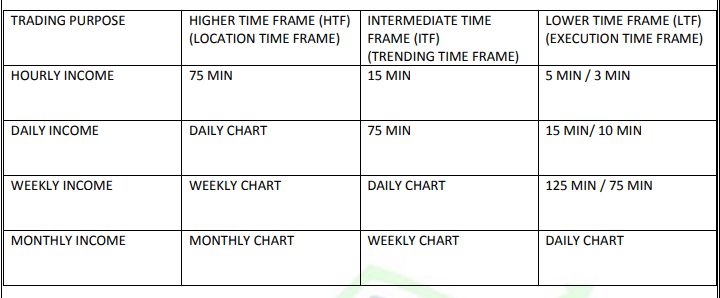
    Trading on Different Time Frames

    TIME FRAMES

    Curve Analysis

    • It is also known as location analysis.
    • What is location???
    • Location gives you an idea about how high or how low you are on theprice curve.

    CAUTION :

    1. If you are buying on a strong daily demand but you are near weeklysupply, Chances are very high that your
      will get stopped out.
    2. If you are selling on strong 15 min supply, but you are near to daily demand, chances are very high that your
      trade will getstopped out.

    Steps in Identifying location on a price chart

    1. Mark Nearest fresh supply zone & nearest fresh Demand zone.
    2. Divide this area between supply and demand into 3 parts by using
      retracement tool, start it from proximal line of a supply to proximal line of a demand.
    PRICE CHART LOCATION

    RULES :

    1. If CMP( Current market price) is trading high on the curve or very high onthe curve.
      Action – SELL ( at execution time frame )
    2. If CMP( Current market price) is trading low on the curve or very low onthe curve.
      Action – BUY ( at execution time frame )
    3. If CMP( Current market price) is trading in an equilibrium area
      Action – will go to trending time frame and check the trend and will plantrade according to the trend.
      At Intermediate Time Frame
    • Trend Up – BUY
    • Trend Down – SELL
    • Trend Sideways – IGNORE
      Note –
      1.If there is no fresh supply but fresh demand – Assume that stock is trading in the equilibrium and trade with
      the trend.
      2.If there is no fresh demand but fresh supply – Assume that stock is trading in the equilibrium and trade with
      the trend.

    Understanding Risk Per Trade

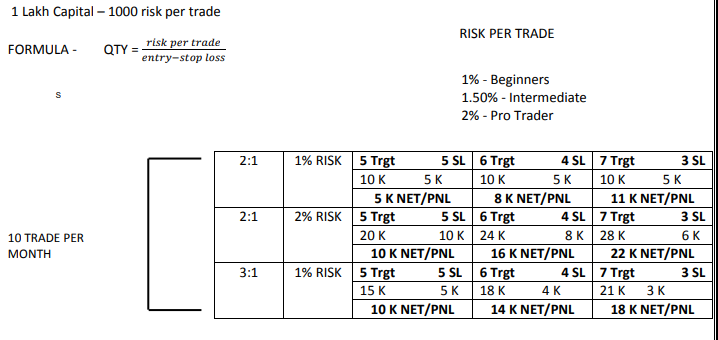
    One of the first steps in risk management is determining how much capital to risk per trade. Based on professional guidelines:

    • 1% Risk – Suitable for beginners
    • 1.5% Risk – Ideal for intermediate traders
    • 2% Risk – Used by pro traders

    For example, if a trader has a capital of ₹1,00,000 and follows a 1% risk rule, they should not risk more than ₹1,000 per trade. This limits potential losses and allows room for recovery from drawdowns.

    RISK MANAGEMENT

    Position Sizing Formula

    The right position sizing ensures that traders do not over-leverage their capital. The formula to calculate quantity per trade is:

    QTY = Risk per Trade / (Entry Price – Stop Loss Price)

    For instance, if the stop-loss distance is ₹10 and the risk per trade is ₹1,000, the position size should be 100 shares.

    Risk-to-Reward Ratio

    Successful traders ensure that their potential rewards outweigh their risks. The recommended risk-to-reward ratios are:

    • 1:2 – A balanced risk-reward setup
    • 1:3 – Ideal for sustainable trading
    • 1:5 – High-probability trades

    If a trader risks ₹1,000, they should aim for a profit of at least ₹2,000 with a 1:2 risk-reward ratio.

    Trade Score

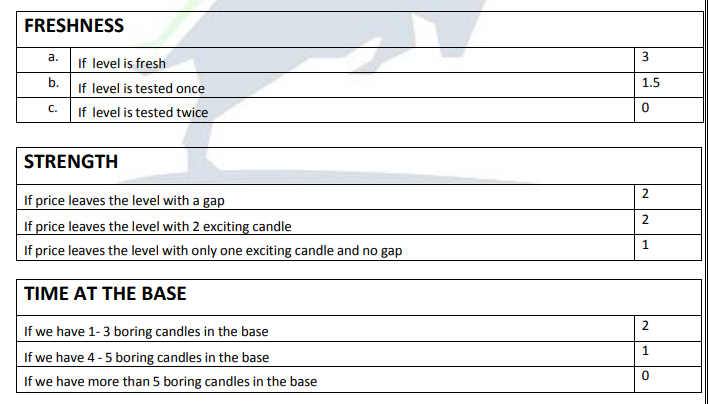
    A trade’s strength is determined by its score. A minimum trade score of 5 is required for an entry, while a score of 7 or higher is considered ideal.

    Components of a Trade Score:

    • Freshness
    • If a level is fresh: 3 points
    • If tested once: 1.5 points
    • If tested twice: 0 points
    • Strength
    • If price leaves the level with a gap: 2 points
    • If price leaves the level with two exciting candles: 2 points
    • If price leaves the level with only one exciting candle and no gap: 1 point
    • Time at the Base
    • If the base has 1-3 boring candles: 2 points
    • If the base has 4-5 boring candles: 1 point
    • If the base has more than 5 boring candles: 0 points
    TRADE SCORE

    Entry and Exit Strategies

    There are three types of entries based on credibility and trade confirmation:

    1. Set & Forget (Trade Score 7+) – Entry is placed with predefined stop-loss and target, requiring minimal monitoring.
      Image: pdf pg20
    2. Confirmed Entry (Trade Score 5-6) – Entry is made only after price action confirms the trade setup.
      Image: pdf pg20
    3. Aggressive Entry (Trade Score 5+) – Entry is made in anticipation of price action without full confirmation.
      Image: pdf pg21 & 22 Multiple cases n multiple images

    Exit Strategies

    • Target-based exit – Predefined profit target is reached.
    • Trailing Stop-Loss – Exit trade as price moves against the trend.
    • Break-even Exit – Move stop-loss to entry point when price moves favorably.

    Common Trading Mistakes to Avoid

    1. Overtrading – Taking excessive trades without proper setups.
    2. Ignoring Stop-Loss – Not using stop-loss increases risk exposure.
    3. Poor Position Sizing – Trading too large can wipe out capital quickly.
    4. Emotional Trading – Letting fear and greed dictate decisions.
    5. Lack of Trade Review – Not analyzing past trades prevents learning.

    Conclusion

    Risk management is the backbone of successful trading. By implementing proper risk-reward ratios, position sizing, stop-loss strategies, and disciplined trade execution, traders can achieve consistent profitability. Follow these principles and refine your approach to master risk management and thrive in the markets.

    Stay tuned for more insights into professional trading strategies!

    PART – 4 TECHNICAL ANALYSIS

    PART – 2 TECHNICAL ANALYSIS

    TheHustleSpot

    BUSINESS IDEAS & SIDE HUSTLES

    Designed with WordPress